Blank pages in a document can make an unprofessional impression on editors or potential employers. Microsoft Word is known to create blank pages in a document, so you should make sure to delete them whenever possible. Lucky for you, we can show you how to delete a page in Word in just a few steps.
Our goal is to help others avoid the frustration associated with blank pages. Since Microsoft Word is a popular document creator, we’ve put together the following guide to help you delete those unwanted pages should they crop up in this particular word processor. Should you also need to delete a page in Word that has text and graphics, our guide includes instructions for that as well.
How to delete a page with content in Word
We can teach you how to delete a page in Word, but deleting a page with text and graphics is different from deleting a completely blank page. So first, let’s walk through the steps to delete a page in Word that’s filled with content.
Step 1: The first step in deleting a page is to select it. Either scroll to the page or use the Go to function (Ctrl + G on Windows, Option + Command + G on MacOS).
When you’ve found the page, select any spot on it.
Step 2: Next, select all content on the page. It might sound like you’ve already done this step, but this is so that Word knows that you want to delete the whole page, not just some of the content on it. You can do this one of two ways:
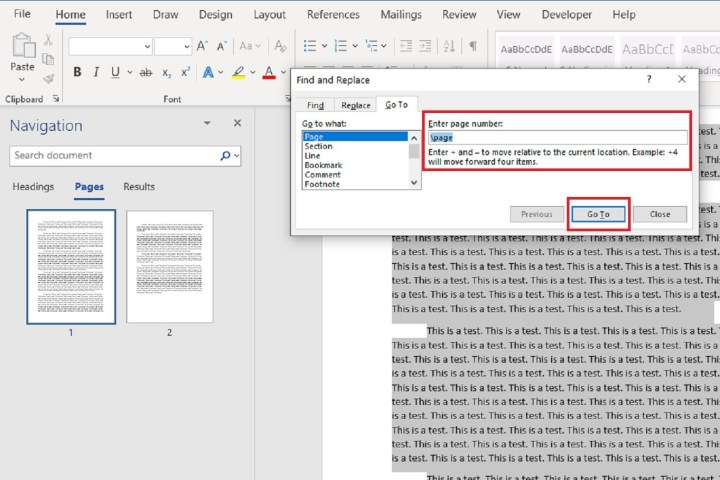
The first method: Open the Go to function (Ctrl + G, or Option + Command + G if you’re on a Mac) and type “page” in the Enter page number box. Then, select Go to (or press Enter or Return on your keyboard) followed by Close. (Note: This method only seems to work on pages that are completely filled with content. If you’re working with a page that is only half filled with text or images, you may want to use the second selection method below.)
The second method: You can also use your cursor to drag through the content on the page to select it all. If you’re selecting a page that is only partially filled with content, be sure to drag your cursor past the end of the content, as if you were selecting the blank parts of the page too. If you don’t do that, step three may not work the way you want it to.

screenshot
Step 3: Finally, delete the page. Microsoft Word doesn’t have a dedicated page-deletion tool, but now that we’ve selected the page’s content, we can delete it easily.
Double-check that you’ve selected the entirety of the page and press the Delete key on your keyboard.
How to delete a blank page in Word
Most text editors, Word included, have a habit of creating blank pages at the end of your document for seemingly no reason. Deleting those before you fire it off to your boss or the printer is usually a good idea. Here’s how to delete a page in Word even when that page is blank:
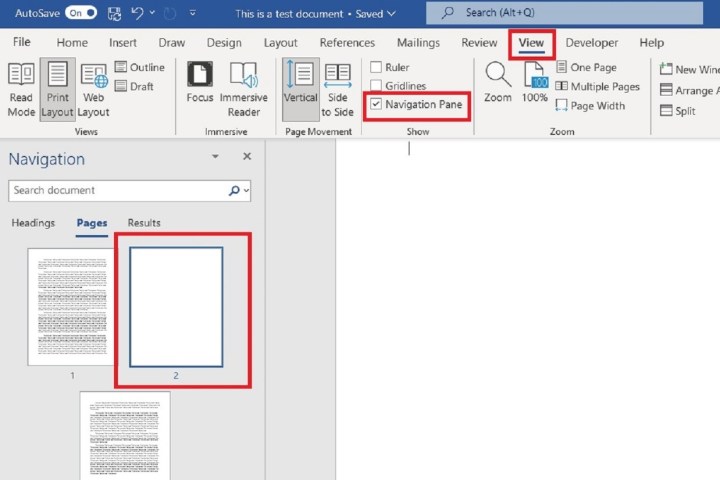
Step 1: To find the blank page(s), open up the Navigation pane. You can do so by selecting the View tab and making sure that the Navigation pane box is ticked.
When the sidebar on the left opens, select Pages to show all the pages in your document.

screenshot
Step 2: In the Navigation pane, select the blank page you want to remove.
Step 3: Press the Delete key on your keyboard.
The blank page should now be removed.
Now that you know how to delete a page in Word, take a look at how to remove a page break or how to double-space in Word.
Editors’ Recommendations
Credit: Source link


Comments are closed.