When it’s time to factory reset a computer, you’ve probably exhausted all your other reboot and repair options. After all, performing on a full-on factory reset isn’t exactly fun, but sometimes it’s the only thing that will get a laptop or desktop back in working order.
If you’re the proud owner of an HP laptop that that requires a factory reset, you’ll be pleased to learn that the restart process isn’t too complicated. Still though, there are some important parts of the process you won’t want to miss, so we’ve assembled this step-by-step guide to help you along the way.
How to factory reset an HP laptop on Windows 11 or 10
Step 1: Open the Settings window on your Windows 11 or 10 laptop by pressing Windows Key + I.
Step 2: Select the Update and security option, and then select Recovery.

Image used with permission by copyright holder
Step 3: For a clean reset of the HP laptop where it goes back to its factory settings, select Get started situated below the Reset this PC section.

Image used with permission by copyright holder
Step 4: The next step involves choosing whether you want the files contained within your system to remain on the device after the reset is performed. Select Keep my files to go ahead with this particular option. You can also choose Change settings after clicking this option to not restore apps and settings that came with the PC.
Alternatively, you can also select the Remove everything option, which will completely return the system to its factory setting, meaning it will more or less be a new, fresh HP laptop with no files, programs you’ve downloaded, etc., remaining on your machine.
The Remove files and clean the drive option will make the device like new, while the Just remove my files setting won’t perform a clean sweep of the hard drive.
Either way, when clicking the Next button for whichever method you’ve chosen, you’ll be instructed to plug your PC into a power outlet to proceed. Once the factory reset is completed, the screen will display a window to set up the HP laptop once again.

Image used with permission by copyright holder
How to factory reset an HP laptop without a password
Step 1: Reboot the HP laptop by making sure it’s completely shut down and then turn it on again.
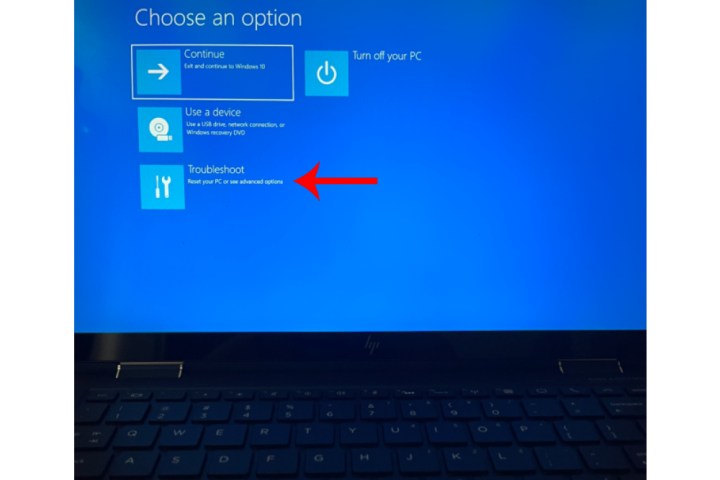
Step 2: Select the F11 button immediately after the system has booted to access Troubleshooting. Please note that you may need to use other F keys such as F9 or F10 if F11 doesn’t work for you.

Image used with permission by copyright holder
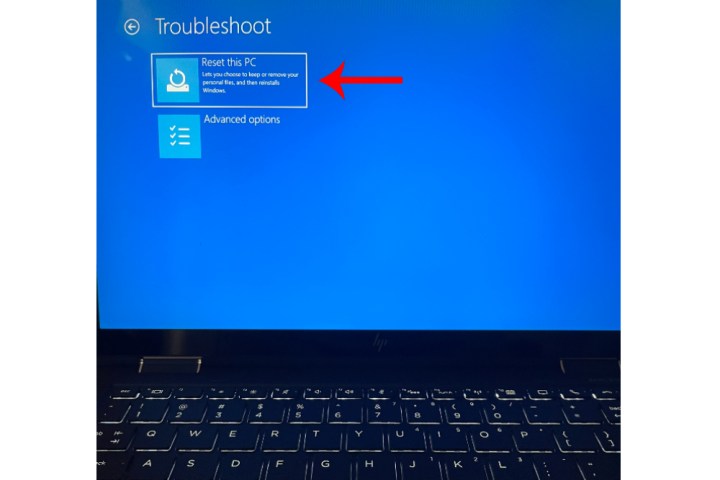
Step 3: Select Troubleshoot and then choose the Reset this PC option. Simply follow the steps outlined from the previous section to complete the factory reset process.

Image used with permission by copyright holder
Can you factory reset an HP laptop running Windows 7 or 8?
If your HP laptop is running Windows 7 or 8, you’ll still be able to perform a factory reset of the machine. For Windows 7, the steps to do so are slightly different than modern Windows OS types.
For Dell laptops running Windows 8, your factory reset options are identical to the steps you’d follow for a Windows 11 or 10 reset.
Factory resetting your Windows 7 Dell laptop (when it boots correctly)
Step 1: Start up the laptop, then head to the Control Panel.
Step 2: Click System Security > System > System protection > System restore.
Step 3: You’ll have the choice of resetting to your most recent restore point (Recommended Restore), or a restore point of your choosing (Choose a different restore point).
Step 4: Click Next > Finish. Then, click Yes to begin the restoration.
Factory resetting your Windows 7 Dell laptop (when it doesn’t boot)
Step 1: Begin by restarting your computer. During the actual restart, press the F8 key once per second until your Dell displays the Advanced Boot Options screen.
Step 2: Using your keyboard’s arrow keys, highlight Repair Your Computer and click Enter.
Step 3: Choose your language settings, then click Next.
Step 4: Log in as the administrator, then click OK. Then, click System Restore > Next.
Step 5: Choose whether or not you’d like to restore from the most recent restore point (the default), or click the Show more restore points box and search for a different point.
Step 6: Click Yes to begin the restoration. When the restore is finished, click Restart.
For a comprehensive guide on how to factory reset the different versions of Windows regardless of your system manufacturer, be sure to visit our detailed guide.
Editors’ Recommendations
Credit: Source link


Comments are closed.