Printing to PDF can be a great way to save a document on your computer, especially if you don’t have immediate access to a printer. If you have Windows, then you know the process has not always been seamless. But now with Windows 10 and Windows 11, print to PDF should be one of your default functions on your computer, making it easily accessible.
Here is our comprehensive rundown of how to print to PDF in Windows. We also have other helpful guides, including how to password-protect a PDF, convert a PDF to Excel, convert a PDF to a Word Document, and how to combine PDF files.
Using native tools in Windows: setting up Microsoft Print to PDF
The Microsoft Print to PDF tool should automatically come with your Windows 10 or 11 device. But just in case you don’t have it on your Windows PC, here’s how to set it up:
Step 1: Navigate to the Windows 10 Settings page, which you can find in the Start Menu or search for from the search bar. Once there, select Devices.
In Windows 11, you’ll navigate to the Settings page the same way, but you’ll select Bluetooth & devices instead.
Step 2: Once in Devices, select the Printers & scanners section from the left menu. If you have the Microsoft Print to PDF option, you should see it here with the list of your potential printing options. If you don’t see it, select the option that says Add a printer or scanner.
In Windows 11, the Add a printer or scanner option has its own Add device button. Select this button.
Step 3: From there, Windows will attempt to find your elusive printer, and it won’t work (although it may find other local printers). When it’s finished, select the option that says The printer that I want isn’t listed. This will open a secondary window with options for finding printers. At the bottom, you should see an option to Add a local printer or network printer with manual settings. Select this option, and then choose Next.
In Windows 11, The printer that I want isn’t listed option is not clickable. But it does have its own Add manually button. Select this button. Then follow the rest of the Windows 10 instructions above.
Step 4: In the next window, open the drop-down menu beside Use an existing port, and then select FILE: (Print to File), and choose Next.
Step 5: In the following window, choose Microsoft as the manufacturer, then scroll down to highlight Microsoft Print to PDF before selecting Next again.
Step 6: When given the choice to replace the current driver or use the driver already installed, we recommend simply using the current driver and selecting Next.
Step 7: After Windows 10 prompts you to name the print-to-PDF feature — we recommend just assigning it the default name so it’s easier to find — select Next one last time to install the desired printer.
Using native tools in Windows: Microsoft Print to PDF
Now that you have Microsoft Print to PDF set up on your Windows PC, here’s how to use it:
Step 1: Go to print your document as you normally would, and select Microsoft Print to PDF as your printer. You may need to select a Print button afterwards.

screenshot/Anita George / Digital Trends
Step 2: You’ll be asked where you’d like to save the file. Choose the location and a name, and click OK or Save. After a few seconds, you’ll have a brand new PDF.
Try Adobe Acrobat
Although the latest version of Microsoft’s operating system makes it very easy to print to PDF in Windows, users may want access to more advanced options when it comes to controlling their print-to-PDF settings. In this case, third-party software can offer an alternative way to “print” your documents in PDF form.
If you have Adobe Acrobat installed on your computer, you’ve got another print-to-PDF option. Although it’s an expensive tool, there is a free trial available for those looking for a short-term solution.
Step 1: Once installed, head to the document printer as you usually would, and select Adobe PDF as your printer.
Step 2: Select Print or Save, then name your document and choose a save location for the resulting file. From here, you can do what you like with it — you can even turn your PDF into a JPEG.
Use doPDF
For those of you without Adobe Acrobat or Windows 10, rest assured you can still print to PDF with the right PDF converter, even if the process is a bit trickier. We recommend the free converter doPDF, which you can download from the developer’s official website.
We prefer this software because, unlike similar software, it doesn’t force you to download any random add-ons or malware. It also works with both Windows 7 and Windows 8, as well as Windows 10 and 11.
Step 1: When you get to the website, and simply select the green Free download button, which is located on the right side of the screen.
Step 2: When the installer finishes downloading, navigate to the Downloads folder and double-click the installer to open it. The installation process is pretty straightforward. You’ll just need to follow the prompts.
Step 3: You can use doPDF in two different ways once it’s officially installed on your computer. It allows you to run it as a solitary program, or you can simply add it to Microsoft Office as an add-on.
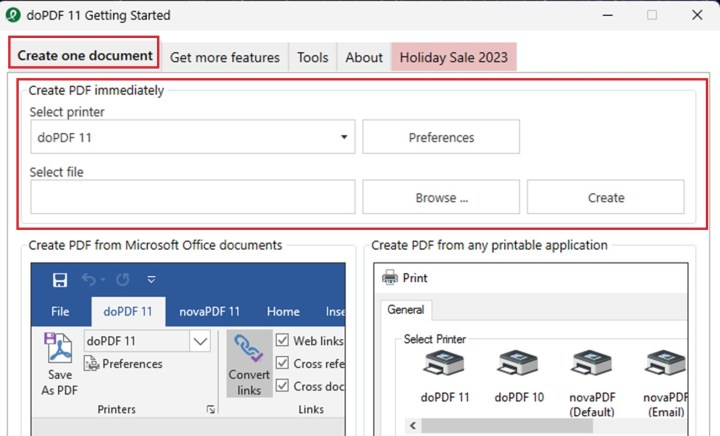
Step 4: Open doPDF by accessing your program list via the Start menu. Go to the tab titled Create one document. Focus on the Create PDF immediately option section. The doPDF printer should appear automatically in the field for printer.

screenshot/Anita George / Digital Trends
Step 5: Select Browse to choose the file you want to print to PDF. Go to the file that you wish to convert and click on it. Select Open.
Step 6: You can choose Create after selecting the file. You should see a pop up box saying that the printer will become the default printer before asking if you would like to continue with this. Just select OK.
(You may also see a notification box that pops up saying the document couldn’t be created. Just select OK and ignore it. It should still work.)
The doPDF software will then open the application you normally use for that document (like Microsoft Word or the Print Pictures window). If the latter, you may still need to select the Print button on that window.
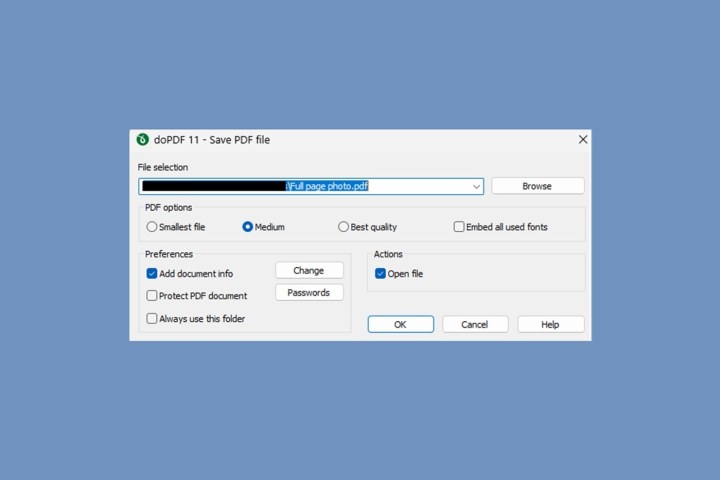
You’ll then be taken to another doPDF pop up screen called Save PDF file. From here, you are able to choose more PDF options. Once you set all your preferences, just select OK to begin printing your document to PDF. As soon as you’ve created the brand new PDF, it should show up on your screen.

screenshot/Anita George / Digital Trends
Editors’ Recommendations
Credit: Source link


Comments are closed.