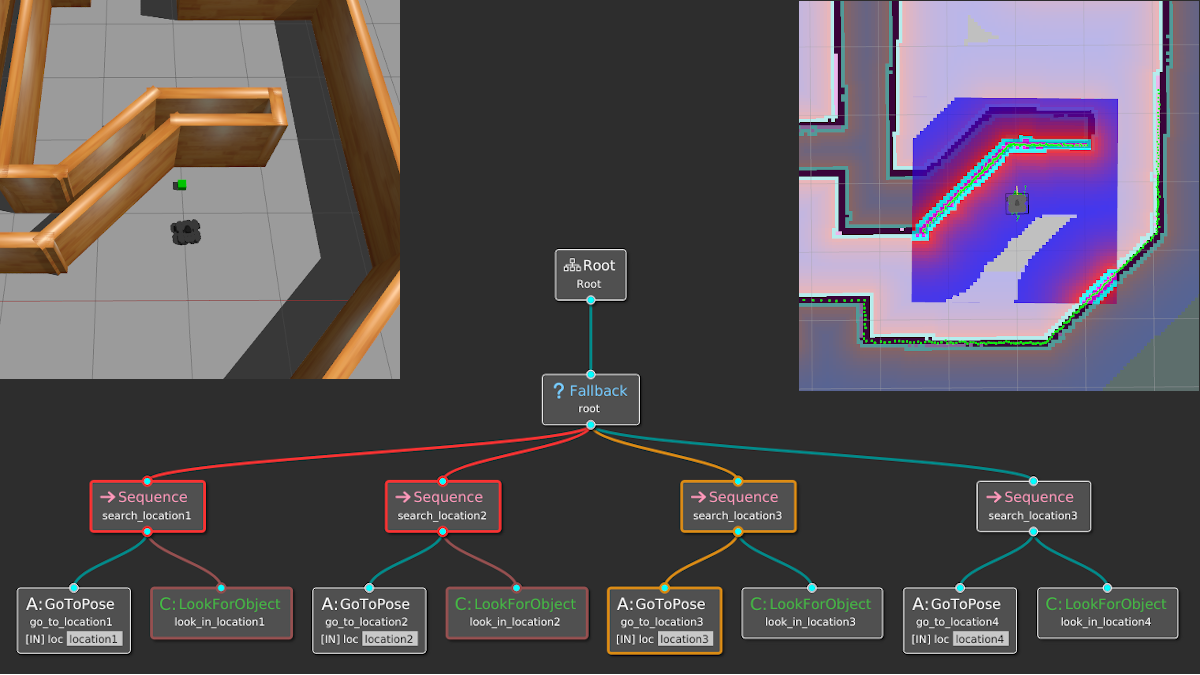
Abstraction in programming has evolved our use of computers from basic arithmetic operations to representing complex real-world phenomena using models. More specific to robotics, abstraction has moved us from low-level actuator control and basic sensing to reasoning about higher-level concepts behaviors, as I define in my Anatomy of a Robotic System post.
In autonomous systems, we have seen an entire host of abstractions beyond “plain” programming for behavior modeling and execution. Some common ones you may find in the literature include teleo-reactive programs, Petri nets, finite-state machines (FSMs), and behavior trees (BTs). In my experience, FSMs and BTs are the two abstractions you see most often today.
In this post, I will introduce behavior trees with all their terminology, contrast them with finite-state machines, share some examples and software libraries, and as always leave you with some resources if you want to learn more.
As we introduced above, there are several abstractions to help design complex behaviors for an autonomous agent. Generally, these consist of a finite set of entities that map to particular behaviors or operating modes within our system, e.g., “move forward”, “close gripper”, “blink the warning lights”, “go to the charging station”. Each model class has some set of rules that describe when an agent should execute each of these behaviors, and more importantly how the agent should switch between them.
Behavior trees (BTs) are one such abstraction, which I will define by the following characteristics:
- Behavior trees are trees (duh): They start at a root node and are designed to be traversed in a specific order until a terminal state is reached (success or failure).
- Leaf nodes are executable behaviors: Each leaf will do something, whether it’s a simple check or a complex action, and will output a status (success, failure, or running). In other words, leaf nodes are where you connect a BT to the lower-level code for your specific application.
- Internal nodes control tree traversal: The internal (non-leaf) nodes of the tree will accept the resulting status of their children and apply their own rules to dictate which node should be expanded next.
Behavior trees actually began in the videogame industry to define behaviors for non-player characters (NPCs): Both Unreal Engine and Unity (two major forces in this space) have dedicated tools for authoring BTs. This is no surprise; a big advantage of BTs is that they are easy to compose and modify, even at runtime. However, this sacrifices the ease of designing reactive behaviors (for example, mode switches) compared to some of the other abstractions, as you will see later in this post.
Since then, BTs have also made it into the robotics domain as robots have become increasingly capable of doing more than simple repetitive tasks. Easily the best resource here is the textbook “Behavior Trees in Robotics and AI: An Introduction” by Michele Colledanchise and Petter Ögren. In fact, if you really want to learn the material you should stop reading this post and go directly to the book … but please stick around?
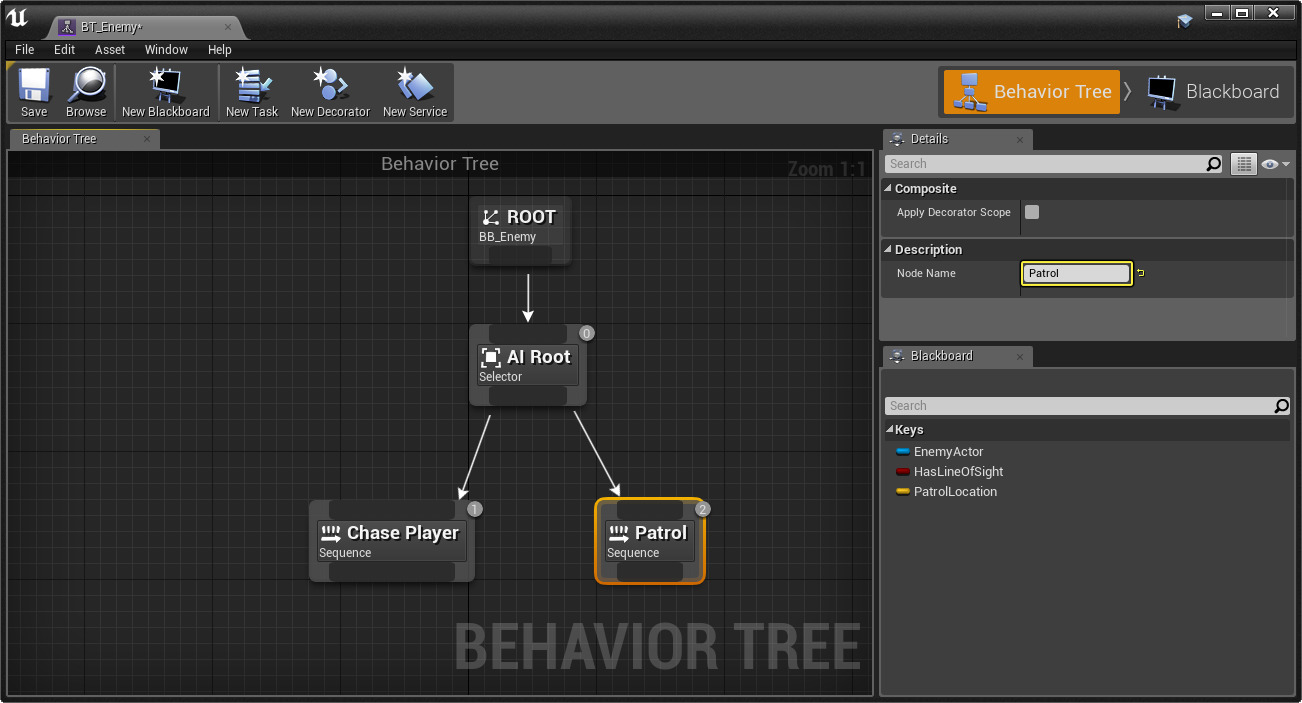
Let’s dig into the terminology in behavior trees. While the language is not standard across the literature and various software libraries, I will largely follow the definitions in Behavior Trees in Robotics and AI.
At a glance, these are the types of nodes that make up behavior trees and how they are represented graphically:
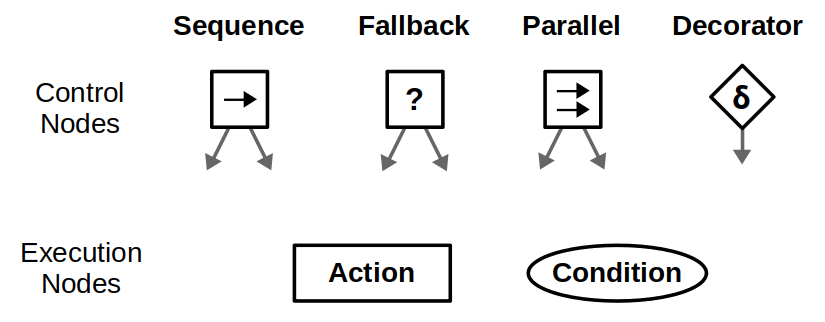
Behavior trees execute in discrete update steps known as ticks. When a BT is ticked, usually at some specified rate, its child nodes recursively tick based on how the tree is constructed. After a node ticks, it returns a status to its parent, which can be Success, Failure, or Running.
Execution nodes, which are leaves of the BT, can either be Action or Condition nodes. The only difference is that condition nodes can only return Success or Failure within a single tick, whereas action nodes can span multiple ticks and can return Running until they reach a terminal state. Generally, condition nodes represent simple checks (e.g., “is the gripper open?”) while action nodes represent complex actions (e.g., “open the door”).
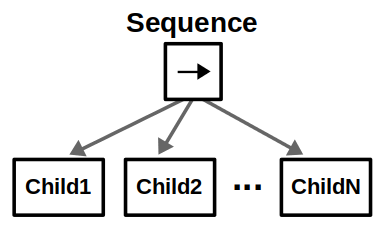
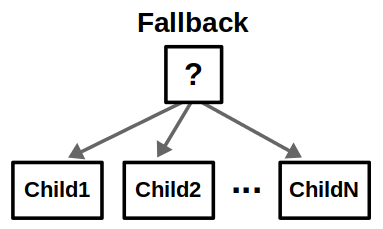
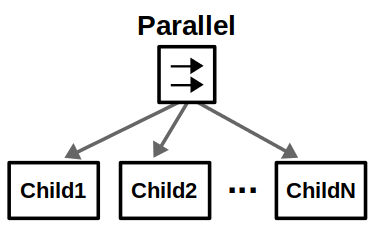
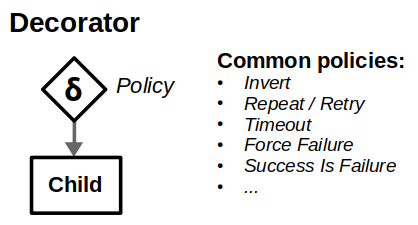
Control nodes are internal nodes and define how to traverse the BT given the status of their children. Importantly, children of control nodes can be execution nodes or control nodes themselves. Sequence, Fallback, and Parallel nodes can have any number of children, but differ in how they process said children. Decorator nodes necessarily have one child, and modify its behavior with some custom defined policy.
Check out the images below to see how the different control nodes work.
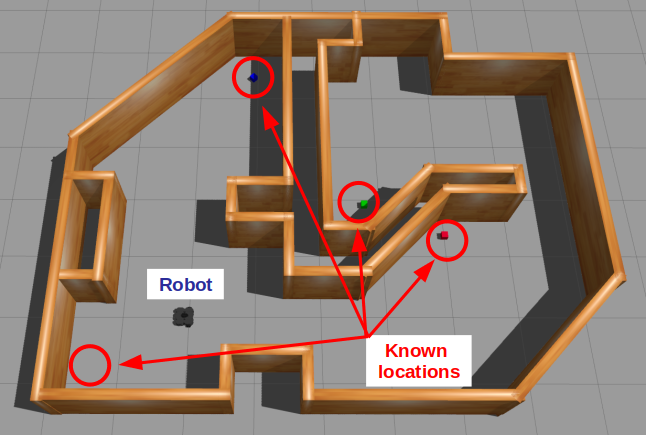
The best way to understand all the terms and graphics in the previous section is through an example. Suppose we have a mobile robot that must search for specific objects in a home environment. Assume the robot knows all the search locations beforehand; in other words, it already has a world model to operate in.
Let’s start simple. If there is only one location (we’ll call it A), then the BT is a simple sequence of the necessary actions: Go to the location and then look for the object.
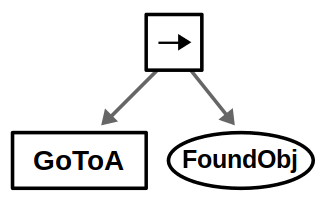
We’ve chosen to represent navigation as an action node, as it may take some time for the robot to move (returning Running in the process). On the other hand, we represent vision as a condition node, assuming the robot can detect the object from a single image once it arrives at its destination. I admit, this is totally contrived for the purpose of showing one of each execution node.
One very common design principle you should know is defined in the book as explicit success conditions. In simpler terms, you should almost always check before you act. For example, if you’re already at a specific location, why not check if you’re already there before starting a navigation action?
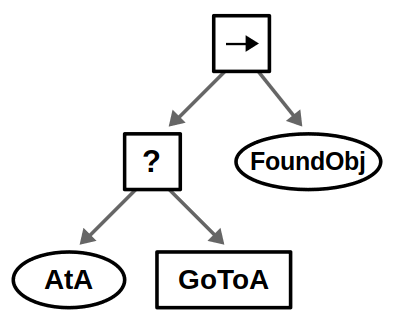
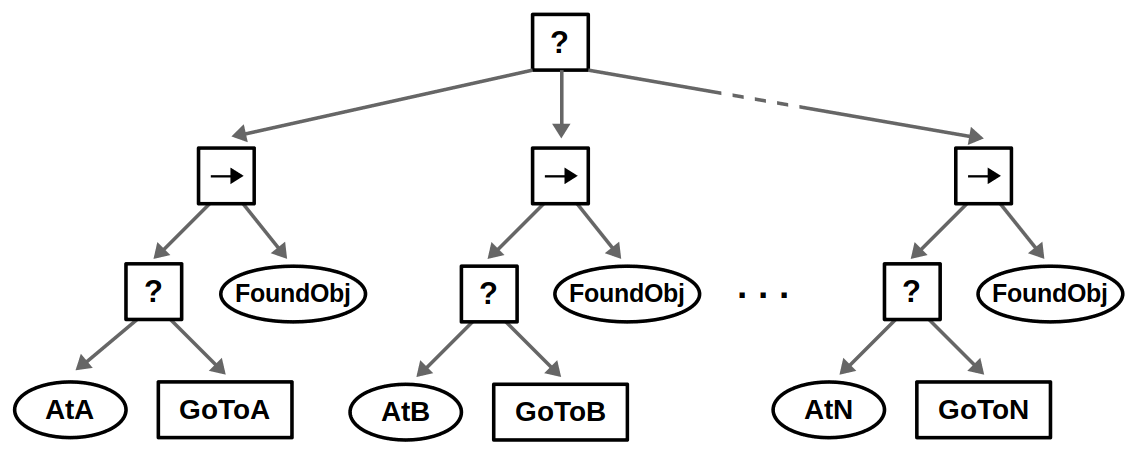
Our robot likely operates in an environment with multiple locations, and the idea is to look in all possible locations until we find the object of interest. This can be done by introducing a root-level Fallback node and repeating the above behavior for each location in some specified order.
Finally, suppose that instead of looking for a single object, we want to consider several objects — let’s say apples and oranges. This use case of composing conditions can be done with Parallel nodes as shown below.
- If we accept either an apple or an orange (“OR” condition), then we succeed if one node returns Success.
- If we require both an apple and an orange (“AND” condition), then we succeed if both nodes return Success.
- If we care about the order of objects, e.g., you must find an apple before finding an orange, then this could be done with a Sequence node instead.
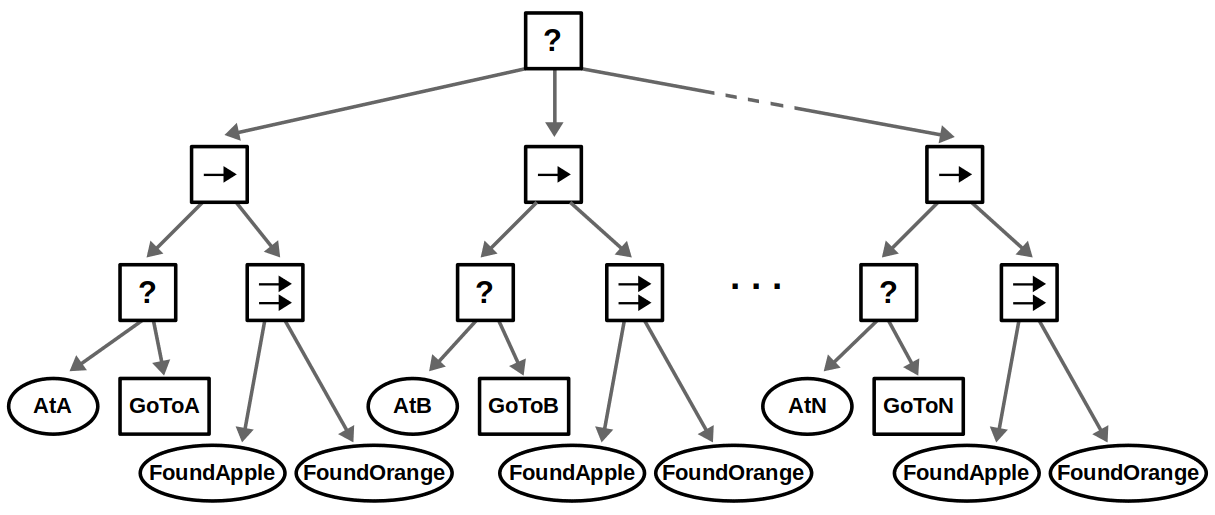
Of course, you can also compose actions in parallel — for example, turning in place until a person is detected for 5 consecutive ticks. While my example is hopefully simple enough to get the basics across, I highly recommend looking at the literature for more complex examples that really show off the power of BTs.
I don’t know about you, but looking at the BT above leaves me somewhat uneasy. It’s just the same behavior copied and pasted multiple times underneath a Fallback node. What if you had 20 different locations, and the behavior at each location involved more than just two simplified execution nodes? Things could quickly get messy.
In most software libraries geared for BTs you can define these execution nodes as parametric behaviors that share resources (for example, the same ROS action client for navigation, or object detector for vision). Similarly, you can write code to build complex trees automatically and compose them from a ready-made library of subtrees. So the issue isn’t so much efficiency, but readability.
There is an alternative implementation for this BT, which can extend to many other applications. Here’s the basic idea:
- Introduce decorators: Instead of duplicating the same subtree for each location, have a single subtree and decorate it with a policy that repeats the behavior until successful.
- Update the target location at each iteration: Suppose you now have a “queue” of target locations to visit, so at each iteration of the subtree you pop an element from that queue. If the queue eventually ends up empty, then our BT fails.
In most BTs, we often need some notion of shared data like the location queue we’re discussing. This is where the concept of a blackboard comes in: you’ll find blackboard constructs in most BT libraries out there, and all they really are is a common storage area where individual behaviors can read or write data.
Our example BT could now be refactored as follows. We introduce a “GetLoc” action that pops a location from our queue of known locations and writes it to the blackboard as some parameter target_location. If the queue is empty, this returns Failure; otherwise it returns Success. Then, downstream nodes that deal with navigation can use this target_location parameter, which changes every time the subtree repeats.
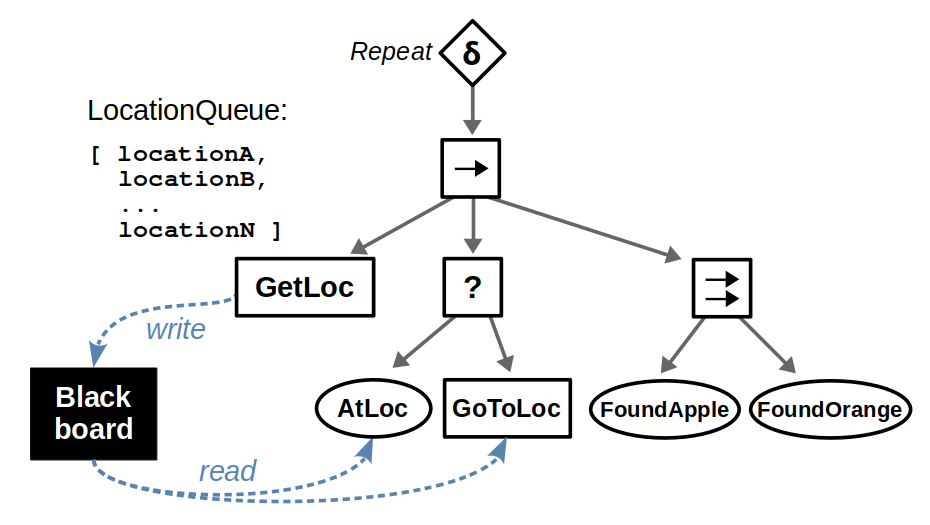
You can use blackboards for many other tasks. Here’s another extension of our example: Suppose that after finding an object, the robot should speak with the object it detected, if any. So, the “FoundApple” and “FoundOrange” conditions could write to a located_objects parameter in the blackboard and a subsequent “Speak” action would read it accordingly. A similar solution could be applied, for instance, if the robot needs to pick up the detected object and has different manipulation policies depending on the type of object.
Fun fact: This section actually came from a real discussion with Davide Faconti, in which… he essentially schooled me. It brings me great joy to turn my humiliation into an educational experience for you all.
Let’s talk about how to program behavior trees! There are quite a few libraries dedicated to BTs, but my two highlights in the robotics space are py_trees and BehaviorTree.CPP.
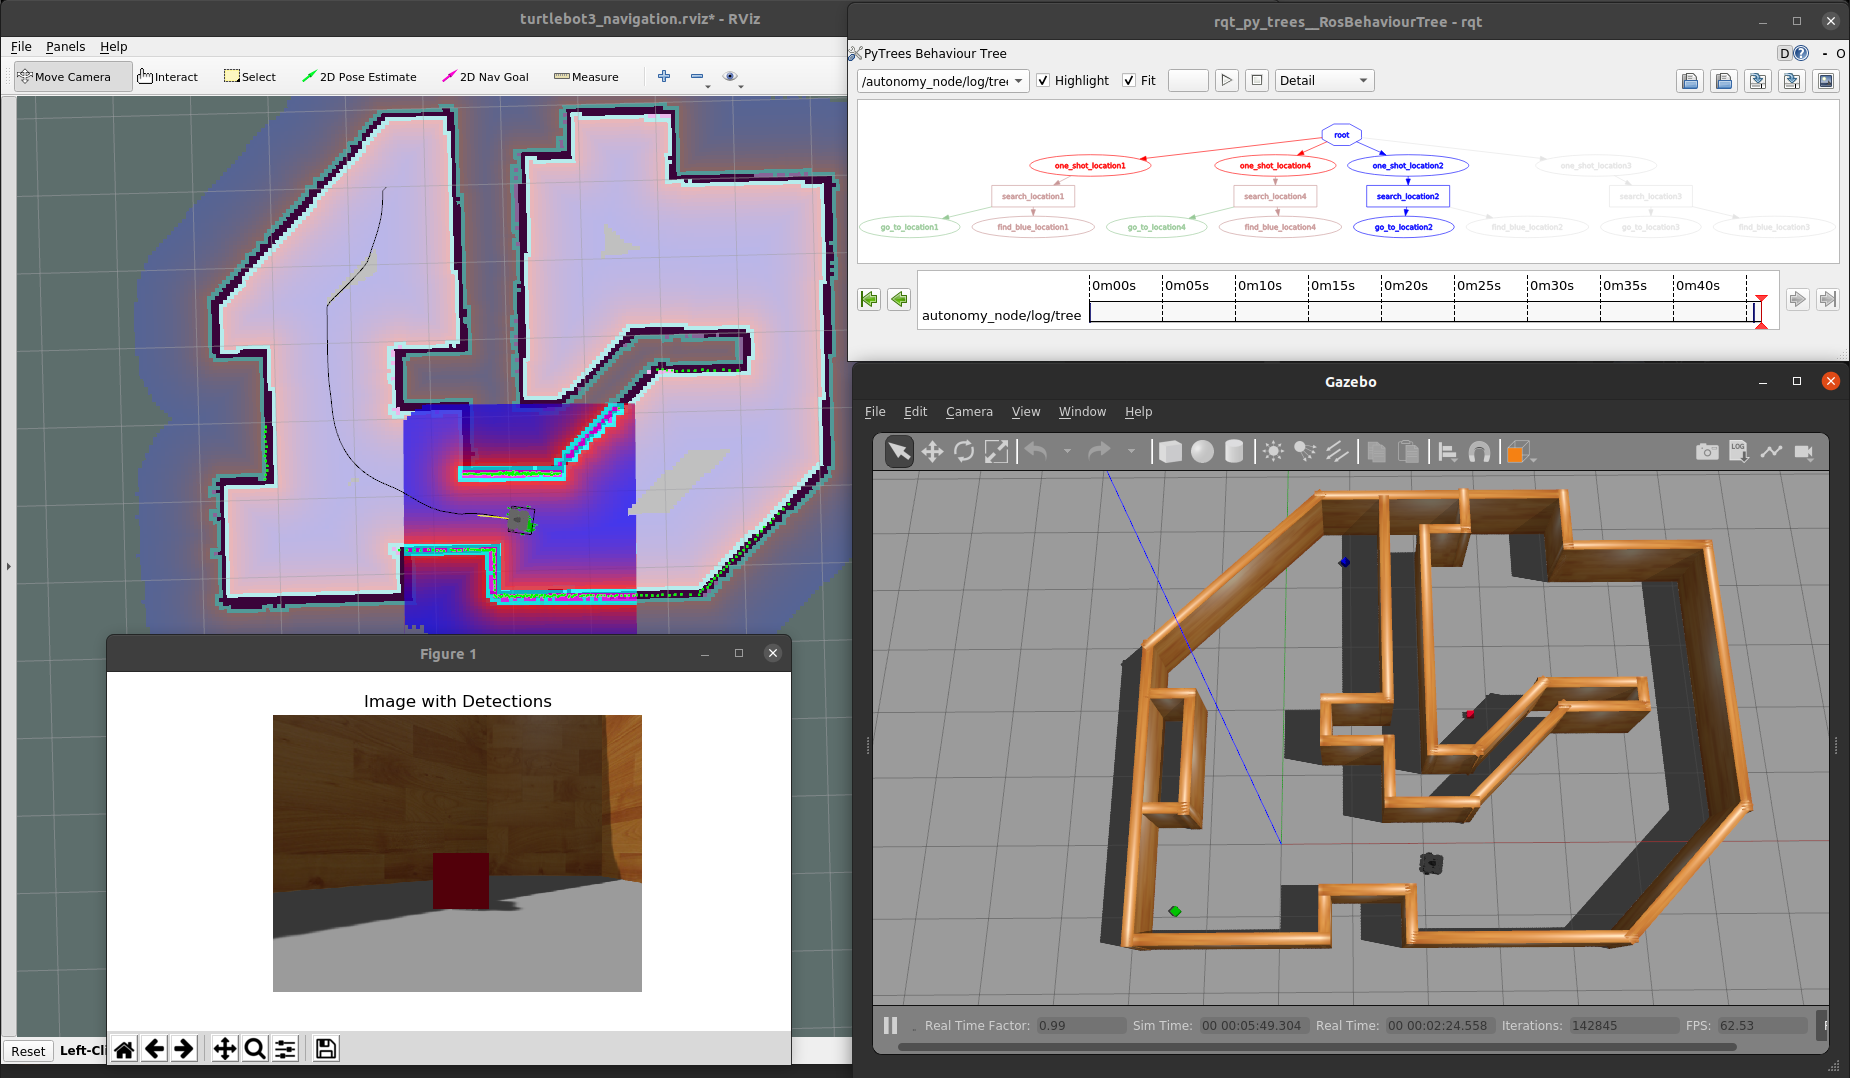
py_trees is a Python library created by Daniel Stonier.
- Because it uses an interpreted language like Python, the interface is very flexible and you can basically do what you want… which has its pros and cons. I personally think this is a good choice if you plan on automatically modifying behavior trees at run time.
- It is being actively developed and with every release you will find new features. However, many of the new developments — not just additional decorators and policy options, but the visualization and logging tools — are already full-steam-ahead with ROS 2. So if you’re still using ROS 1 you will find yourself missing a lot of new things. Check out the PyTrees-ROS Ecosystem page for more details.
- Some of the terminology and design paradigms are a little bit different from the Behavior Trees in Robotics book. For example, instead of Fallback nodes this library uses Selector nodes, and these behave slightly differently.
BehaviorTree.CPP is a C++ library developed by Davide Faconti and Michele Colledanchise (yes, one of the book authors). It should therefore be no surprise that this library follows the book notation much more faithfully.
- This library is quickly gaining traction as the behavior tree library of the ROS developers’ ecosystem, because C++ is similarly the language of production quality development for robotics. In fact, the official ROS 2 navigation stack uses this library in its BT Navigator feature.
- It heavily relies on an XML based workflow, meaning that the recommended way to author a BT is through XML files. In your code, you register node types with user-defined classes (which can inherit from a rich library of existing classes), and your BT is automatically synthesized!
- It is paired with a great tool named Groot which is not only a visualizer, but a graphical interface for editing behavior trees. The XML design principle basically means that you can draw a BT and export it as an XML file that plugs into your code.
- This all works wonderfully if you know the structure of your BT beforehand, but leaves a little to be desired if you plan to modify your trees at runtime. Granted, you can also achieve this using the programmatic approach rather than XML, but this workflow is not documented/recommended, and doesn’t yet play well with the visualization tools.
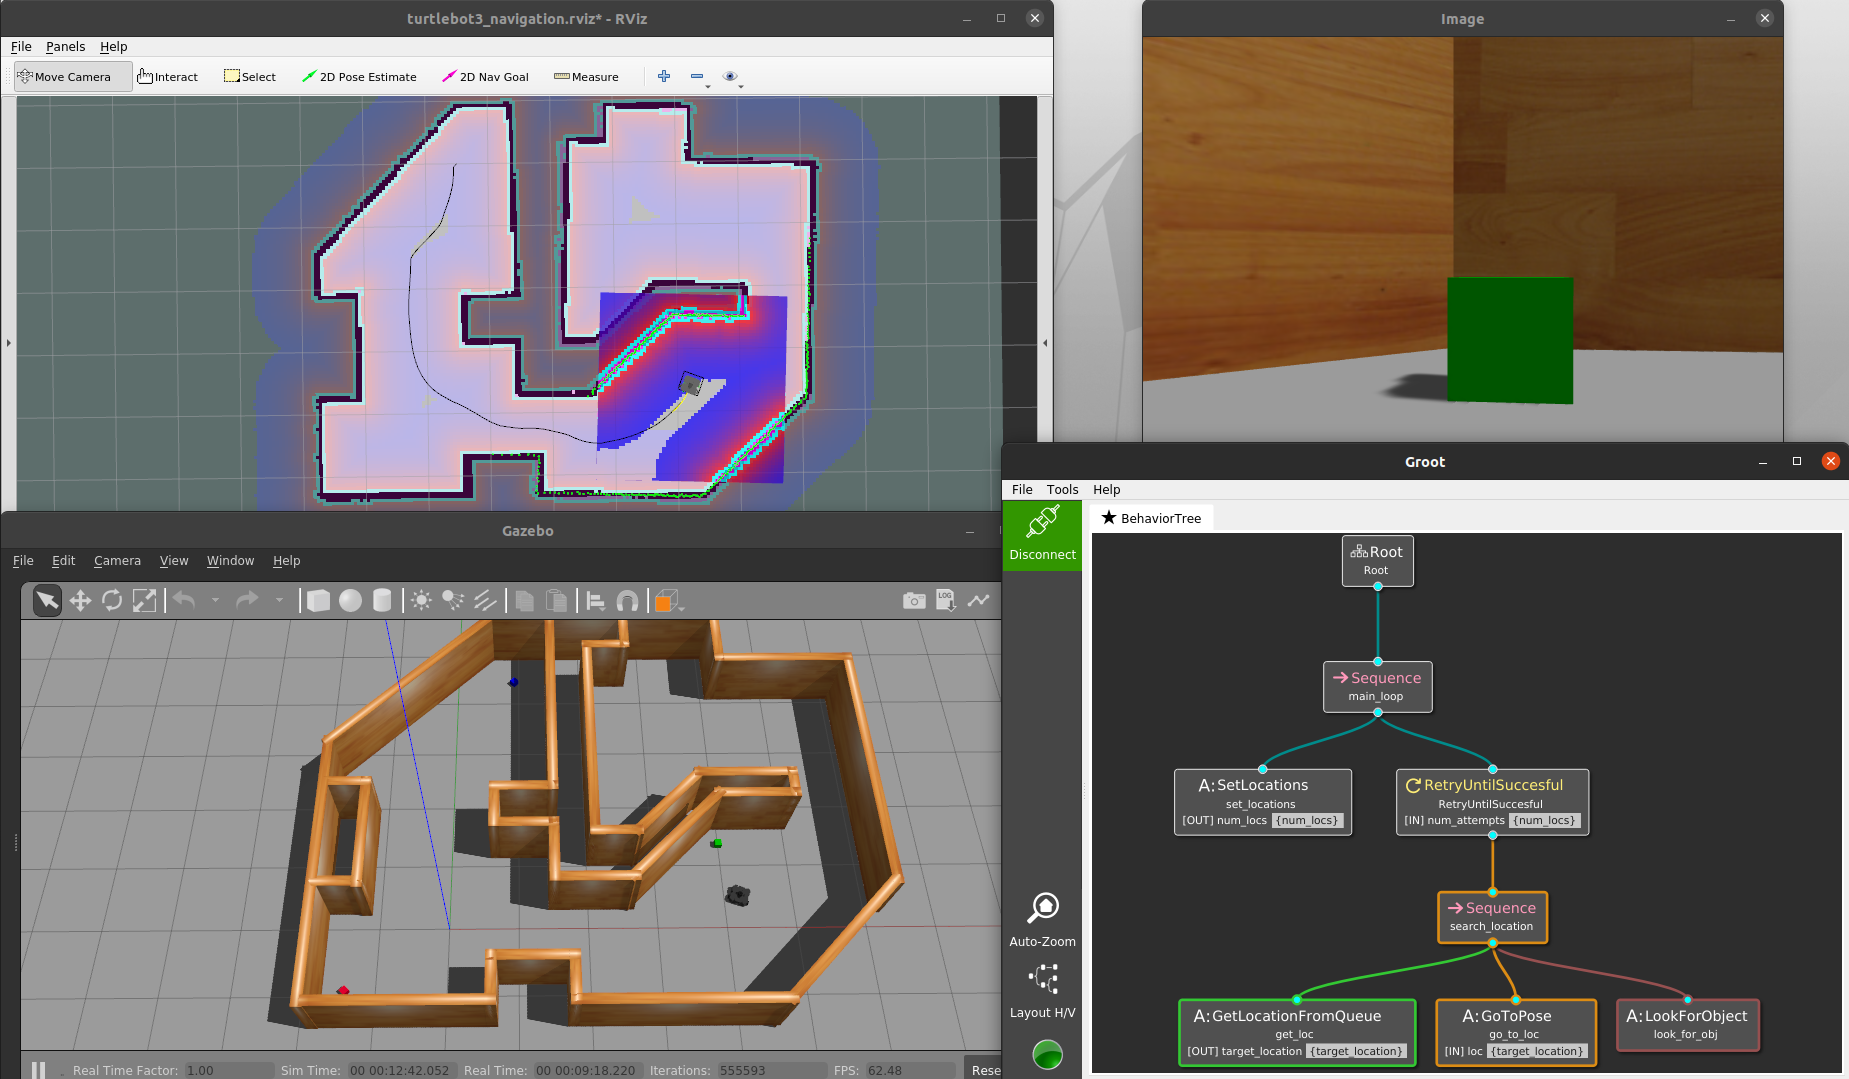
So how should you choose between these two libraries? They’re both mature, contain a rich set of tools, and integrate well with the ROS ecosystem. It ultimately boils down to whether you want to use C++ or Python for your development. In my example GitHub repo I tried them both out, so you can decide for yourself!
In my time at MathWorks, I was immersed in designing state machines for robotic behavior using Stateflow — in fact, I even did a YouTube livestream on this topic. However, robotics folks often asked me if there were similar tools for modeling behavior trees, which I had never heard of at the time. Fast forward to my first day at CSAIL, my colleague at the time (Daehyung Park) showed me one of his repositories and I finally saw my first behavior tree. It wasn’t long until I was working with them in my project as a layer between planning and execution, which I describe in my 2020 recap blog post.
As someone who has given a lot of thought to “how is a BT different from a FSM?”, I wanted to reaffirm that they both have their strengths and weaknesses, and the best thing you can do is learn when a problem is better suited for one or the other (or both).
The Behavior Trees in Robotics and AI book expands on these thoughts in way more rigor, but here is my attempt to summarize the key ideas:
- In theory, it is possible to express anything as a BT, FSM, one of the other abstractions, or as plain code. However, each model has its own advantages and disadvantages in their intent to aid design at larger scale.
- Specific to BTs vs. FSMs, there is a tradeoff between modularity and reactivity. Generally, BTs are easier to compose and modify while FSMs have their strength in designing reactive behaviors.
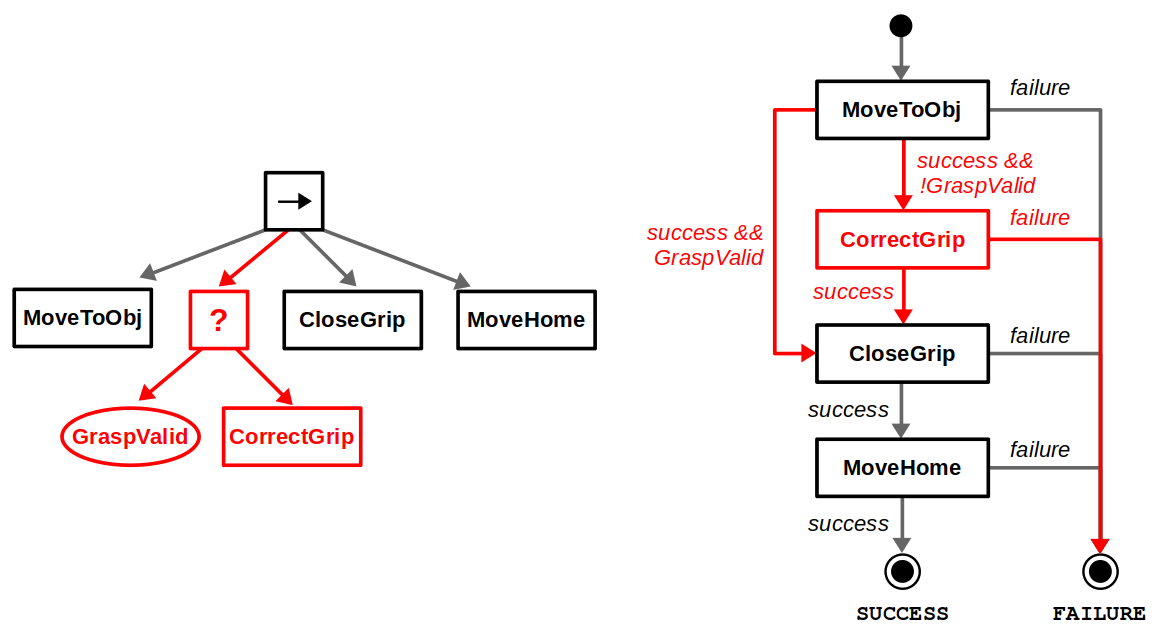
Let’s use another robotics example to go deeper into these comparisons. Suppose we have a picking task where a robot must move to an object, grab it by closing its gripper, and then move back to its home position. A side-by-side BT and FSM comparison can be found below. For a simple design like this, both implementations are relatively clean and easy to follow.
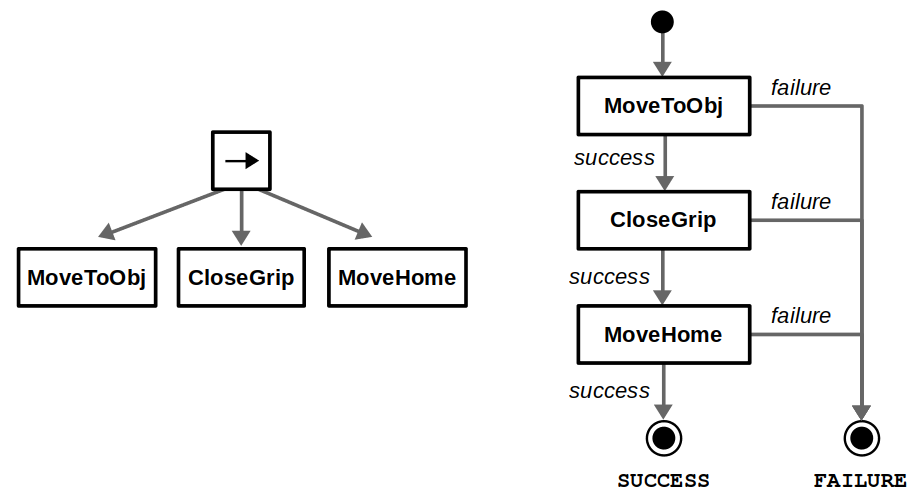
Now, what happens if we want to modify this behavior? Say we first want to check whether the pre-grasp position is valid, and correct if necessary before closing the gripper. With a BT, we can directly insert a subtree along our desired sequence of actions, whereas with a FSM we must rewire multiple transitions. This is what we mean when we claim BTs are great for modularity.
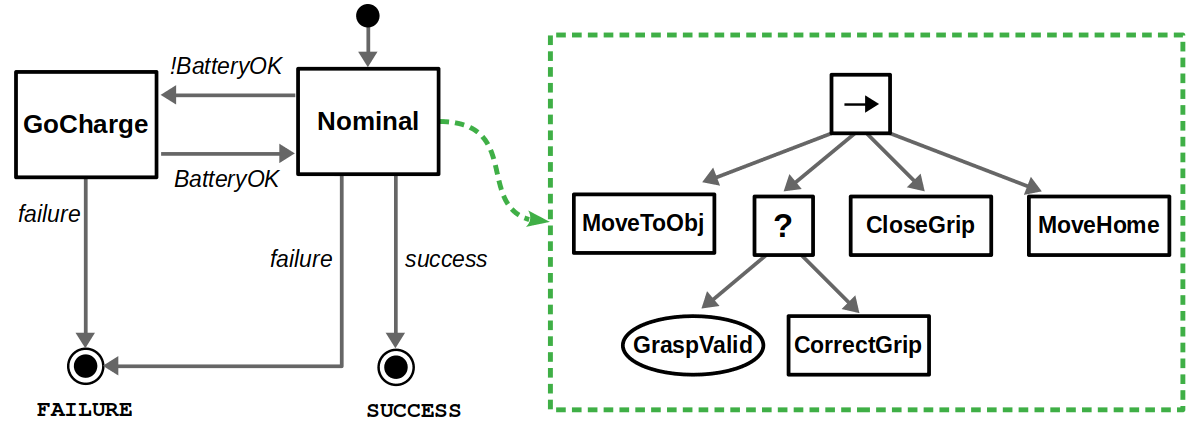
On the other hand, there is the issue of reactivity. Suppose our robot is running on a finite power source, so if the battery is low it must return to the charging station before returning to its task. You can implement something like this with BTs, but a fully reactive behavior (that is, the battery state causes the robot to go charge no matter where it is) is easier to implement with a FSM… even if it looks a bit messy.
On the note of “messy”, behavior tree zealots tend to make the argument of “spaghetti state machines” as reasons why you should never use FSMs. I believe that is not a fair comparison. The notion of a hierarchical finite-state machine (HFSM) has been around for a long time and helps avoid this issue if you follow good design practices, as you can see below. However, it is true that managing transitions in a HFSM is still more difficult than adding or removing subtrees in a BT.
There have been specific constructs defined to make BTs more reactive for exactly these applications. For example, there is the notion of a “Reactive Sequence” that can still tick previous children in a sequence even after they have returned Success. In our example, this would allow us to terminate a subtree with Failure if the battery levels are low at any point during that action sequence, which may be what we want.
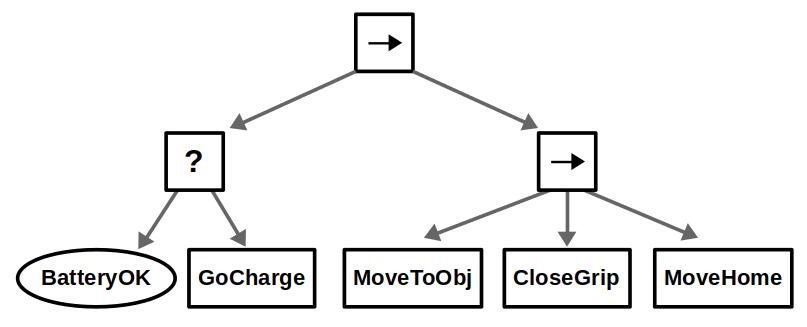
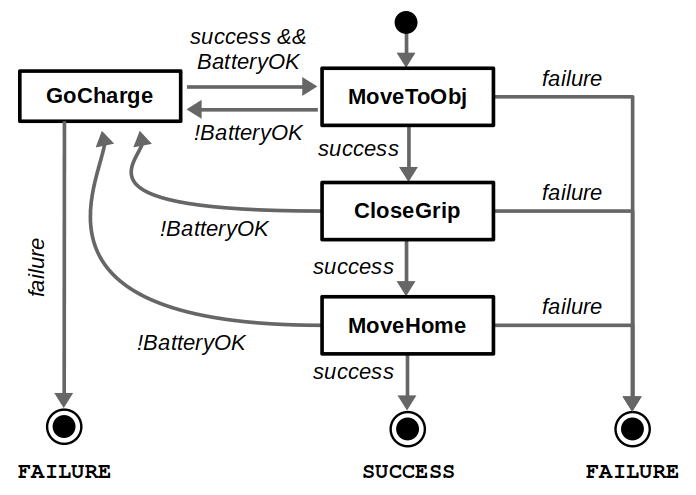
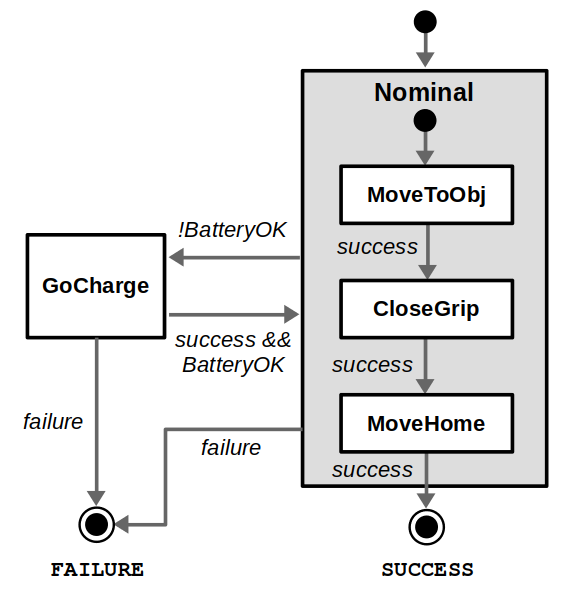
Because of this modularity / reactivity tradeoff, I like to think that FSMs are good at managing higher-level operating modes (such as normal operation vs. charging), and BTs are good at building complex sequences of behaviors that are excellent at handling recoveries from failure. So, if this design were up to me, it might be a hybrid that looks something like this:
Thank for reading through this introductory post, and I look forward to your comments, questions, and suggestions. If you want to try the code examples, check out my example GitHub repository.
To learn more about behavior trees, here are some good resources that I’ve relied on over the past year and a bit.
See you next time!
Sebastian Castro
guest author
Sebastian Castro is a software engineer in the Robust Robotics Group (RRG) at the MIT Computer Science and Artificial Intelligence Laboratory (CSAIL).
Credit: Source link


Comments are closed.